My Blogging Experience

I had such a great time blogging this last semester. Dale mentioned in lecture that blogging is a passion project and I learned exactly how true that is. Keeping a blog about music and makeup/skincare reminded me how important it is to dedicate some of your time to things you love. Music is just about my favorite thing in the world so having an outlet through which I could share my thoughts was wonderful. The blog reviews throughout the semester were my favorite assignments to work on.

Honestly, I didn’t implement as many of the WordPress tool as I should have. I got a lot of use out of connecting my Twitter to my blog so my new posts were automatically publicized through Twitter. However, I wish there was a way to have each promotion on twitter automatically include the title of the post and a couple hashtags. Instead I had to go and manually edit each promotion tweet. I had a few problems with the “add media” feature. A few times I had trouble uploading my photos to my posts and kept receiving an error message.

In the future I would like to organize my blog a little better. My topic was music and makeup/skincare, but I didn’t even mention the makeup/skincare aspect until my last couple posts because I got so absorbed with the music aspect. I would also like to include more photos or videos from concerts or festivals that I attended. I would like to be a music journalist one day, so keeping a blog about music would be a great thing to display my skills and add to my resume. The automatic twitter promotions would be a great feature to utilize professionally. I could share my blog posts to my business twitter. Tags and categories would be another great tool to use professionally. I noticed that tags really helped my posts gain views so adding tags to posts could help me build a greater audience.

I had a couple weeks where I had a large spike in visitors and views. The week of February 6th I had 14 views and 10 visitors. The week of April 24th I had 14 views and 12 visitors. My “Welcome to my blog!” post had 12 views which was the most I ever received. I believe this is because I used several popular tags. This could also be due to other bloggers hoping to gain a follow or some kind of interaction from my blog. I got 8 views on my “Currents by Tame Impala review” post which was a little surprising to me because that week wasn’t one of my most popular weeks. However, after some thought I realized this could be because I sent the link to that post to my mom and dad because I was proud of it. My Twitter promotions added to my blog traffic just a little bit. I had 1 view that was because of a twitter referral.


Everyday Makeup Routine

I know I haven’t talked about makeup at all on this blog so far, but I am going to mix things up a little. This first makeup related post is going to be a step-by-step of my everyday makeup routine. I do this really simple, minimal look pretty much every time I wear makeup unless it’s a special occasion. This look consists of mainly face makeup, brows, lashes, and sometimes eyeliner if I’m feeling like going all out. First, I am going to just give you a walkthrough of some of the products I am going to use, then I’ll go step-by-step and explain the process.

Step 1: Apply moisturizer to face and neck.

The first step to every makeup look should be moisturizer. Gorgeous facial moisturizer by LUSH is my favorite that I have ever used, but it is pretty pricey at about $85. I really think moisturizer is worth the investment; you get the quality you pay for. I generally just use my fingers and palms to apply moisturizer.

Step 2: Apply foundation, concealer, and set.

I like to use Maybelline Matte + Poreless liquid foundation in sun beige. This is one of my favorite drugstore products because I have oily/combination skin so this really helps reduce shine. I use a stipling brush to apply my foundation, but a beauty blender works just as well. I like to dot it all over my face, concentrating on the areas where I want more coverage. Then I blend and make sure that I blend out really well at my jawline and and hairline. Next I apply some concealer with a beauty blender for extra coverage on any problem areas, under my eyes and on my eyelids for a sort of makeshift eyelid primer. I like to use bareMinerals Bareskin concealer. Finally, I set my foundation and concealer with a light dusting of the powder version of Maybelline Matte + Poreless foundation in natural beige.

Step 3: Fill in and define brows.

My favorite product to use on my brows is Benefit Precisely, My Brow Pencil.  I start by brushing my brows into place with the spoolie end of the pencil. Then , using the pencil end, I define the bottom of my brows and fill in sparse areas going from bottom to top. I try to use short strokes to make it look more natural. Next, I brush out any harsh lines with the spoolie brush.

Step 4: Add highlighter and blush.

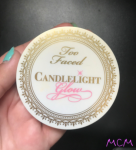
Next, I apply blush to the apples of my cheeks with an angled brush. I use Covergirl blush in rose silk, but honestly I’ve had it for so long, it’s probably time for me to find a new blush. Then I apply Too Faced Candlelight Glow highlighter with an angled highlighter brush on my cheekbones and blend up toward my hairline. I add just a little highlighter to the tip of nose, under my brows, and on my upper lip. Then I make sure to find a clean brush and bend, blend, blend.

NOTE: My makeup routine generally stops here because eye makeup is usually way more effort than I’m willing to give. However, if I’m feeling like trying especially hard, my routine might include some of the rest of these steps.

Step 5: Apply eyeshadow and eyeliner.

I always use one of the Urban Decay Naked eyeshadow palettes, usually Naked 1. I dust on a little light pink or gold on my lid, like Sin or Half-Baked, and put a slightly darker color, like Buck or Smog, in my crease. Next I apply eyeliner either in a really thin line hugging my lash line or I do a cat eye. I like to use Benefit They’re Real Push Up liner to create the general shape of the liner and then I use Kat Von D tattoo liner to make the wing sharper and to darken and define my lash line.

Step 6: Apply mascara.

My favorite mascara of all time is Better Than Sex by Too Faced. I also really like to use Urban Decay Perversion mascara. Better Than Sex gives my lashes the most length but Perversion makes my lashes look very thick and dark. I like to do one coat on my top lashes, do a super light coat on my bottom lashes and then go back and add a second coat on my top lashes once the first coat has dried to avoid clumps.

There you have it, my easy-peasy makeup routine. If I do all 6 steps this takes me about 30-45 minutes but if I just do steps 1-4, I can be ready in 15 minutes.